How to do projection mapping with the Pi Cap and Raspberry Pi

Create an engaging and interactive project for events, retail and more
Chances are you have seen projection mapping either in a video or in real life. There are some amazing videos of projection mapping. It's always engaging and exciting, whether at corporate events, a music festival, a concert, or even in public, like this awesome project in New York.
Electric Paint and our Pi Cap can take projection mapping to the next level by creating magical interactive installations. In this tutorial we'll show you how to use Electric Paint to create sensors on a wall and use them to drive projected animations via a Pi Cap and Raspberry Pi.
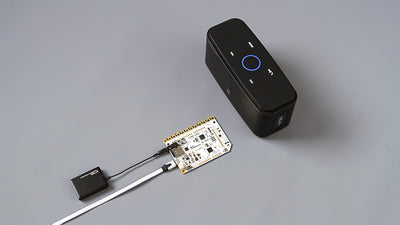
You can use any Raspberry Pi that has a 40-pin GPIO, but we use the Raspberry Pi Zero W as it allows us to connect directly to the Pi Cap on a flat surface and cold solder to the Pi Cap. The Raspberry Pi Zero W is connected to a computer via SSH and takes OSC commands via Processing. These OSC commands are sent to the projection mapping software, in this case, MadMapper. You can download Processing for free from the Processing website and a trial version of the mapping software MadMapper from the MadMapper website.
This tutorial will give you a totally stand-alone project with a ton of expansion potential. However, in comparison to the Touch Board and Interactive Wall Kit, it is trickier to set-up. Make sure to take a close look at all of our interactive wall tutorials to chose an approach that suits your needs and skills. For inspiration, make sure to look at our blog for some impressive projects produced by our global community.
We love it when you share your projects! Post your project on Instagram, YouTube, or Twitter, and make sure to tag @bareconductive or use #bareconductive. You can also send your videos and photos to info@bareconductive.com so we can post them on our site for the world to see.
You will need:
1 x Pi Cap
1 x Electric Paint 10ml
—
1 x Raspberry Pi Zero W
1 x Raspberry Pi power supply
1 x Projector and associated cables
1 x Computer running Mac OS, Windows or Linux
Step 1 Set up the Pi Cap and computer
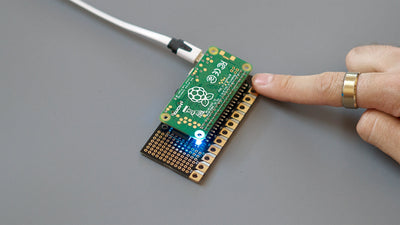
Attach the Pi Zero W to the Pi Cap and to power. If this is your first time using a Pi Cap, make sure to have it set up first by using the set-up tutorial. Throughout this project, we are connected to the Pi Cap from our laptop via SSH.
The code we are running is “datastream-osc.py”. Before you can run it, you need to know the hostname of the computer that is going to run the projection mapping software and is receiving the commands from the Raspberry Pi. The hostname depends on which operating system you are using, so we recommend doing a quick Google search in order to find out the name. Once you have the name, run the code on the Raspberry Pi Zero W with
./PiCapExamples/Python/picap-datastream-osc-py/run -h HOSTNAME
where “HOSTNAME” is the hostname of your computer.
Step 2 Set up Processing and run the code
Next, you need to download Processing, if you haven’t installed it yet. Once downloaded, open Processing, and check its default document folder under
Processing→Preferences…
Then, download the Processing sketch. Unzip the file and move the folder “picap_madmapper” to the location you just looked up and open the file. Head to
Sketch→Import Library→Add Library…
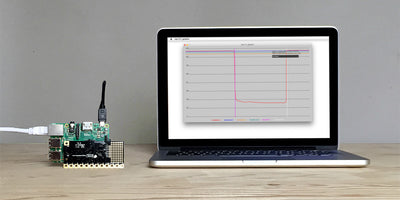
In the search field, look for “oscP5” then click “Install”. Once you have installed the libraries, click on run to launch the sketch. When you touch electrodes 0 or 1 on your Pi Cap, it should write “Electrode 0 was touched” and “Electrode 1 was touched” in the console window.
Step 3 Connect the Pi Cap to MadMapper
Next, you need to set-up your projection mapping software. We’re using MadMapper, for which you can download a trial version from the MadMapper website.
Change the play setting of the videos to “Play the movie to the end of the loop and pause”. Touch the electrode E0 and E1 again, you should see the animation play in MadMapper!
Step 4 Prepare the surface
With most of the hardware done, we now need to make art and create the interactive surface, where you want projection mapping to take place. In this example, we use a piece of white cardboard. We are going to paint the artwork with the help of two stencils, which we attach to the wall.
Before we apply the paint, we need to create a connection to the back and to the Pi Cap. In order to do so, we use two black nails and pierce the cardboard somewhere within our stencils. On the backside of the cardboard, we need to connect the nails to the Pi Cap with a conductive material.
Attach the Pi Cap somewhere along the bottom of the wall where you can still connect it to power later. We use copper tape to connect to the Pi Cap; pierce the tape through the screws, and add a bit of Electric Paint to hold the connection. Cold solder the other end of the copper tape to the Pi Cap with Electric Paint.
We can now paint the sensors with Electric Paint by simply painting the stencils with a brush. Leave the paint to dry, and in the meantime, we can transform the animations in MadMapper. You can find full instructions for creating stencils in our how to stencil with Electric Paint tutorial.


Step 5 Prepare the animations in MadMapper
Back on your computer, position the projector so that it shines onto your surface and connect it to your computer. Open MadMapper and enter the “Full Screen Mode” of MadMapper. Move and scale the video to your liking, checking with the output of the projector if the visual is fitting nicely with the sensor.
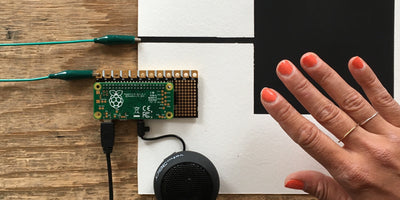
Step 6 Touch the paint and watch the animation
Now everything has been assembled and we can give the projection mapping a test. Remember, at this point, we should have the OSC code running on the Pi Cap, the Processing sketch running on your computer and have MadMapper open with the animations. Try touching the paint on your surface and watch the animation unfold!
Step 7 Next steps
If you want to change one video animation or more, then have a look inside the Processing sketch. If you look inside the code you can find the lines “mediasList[0] = “bubble_animation.mp4″;” and “mediasList[1] = “bubble_animation.mp4″;”. The number inside the square bracket corresponds to the electrode that is touched, so for example when touching electrode 0, MadMapper will play “bubble_animation.mp4”. If you want to use your own animation, you need to change the name in Processing. Therefore, if you want to include “animation1.mp4”, you need to include this filename in the Processing sketch, e.g. “mediasList[0] = “animation1.mp4″;”.
If you want to add sound to the project, just add the sound to the animation and let the projection mapping software play it.
There are so many possibilities to take this project further, for example, instead of having the surface vertically, you can have it horizontally, and have an interactive table. You could even embed the paint in a sculpture!