Make a Philips Hue light switch with the Pi Cap

Use the Pi Cap to make a touchless light switch for Philips Hue system
Philips Hue is the most popular smart light bulb system on the market. They are easy to set-up and widely available. They use Zigbee to communicate with the Philips Hue bridge, which is connected via an Ethernet cable to the internet. This tutorial shows you how to create a proximity light switch for Hue lights and the Pi Cap. All you need is one Philips Hue light bulb, a Hue hub, a Pi Cap, alligator clip and a Printed Sensor. This project works for all Philips Hue bulbs: Philips Hue White, Philips Hue Ambience, and Philips Hue Color.
You can take this project as a basis to then create a Philips Hue dimmer switch or use with more smart bulbs.
In this installation, we SSH'd into the Raspberry Pi. Also, this tutorial presumes that you already have set-up at least one Philips Hue light with your Hue app. If you haven't set up your Pi Cap yet, please do so by following the set-up tutorial. If you haven't set up your Hue bulbs, please follow the Philips Hue tutorial to set up your Philips Hue lights and Philips Hue bridge. At the time of writing, this tutorial doesn't support Apple Homekit.
We love it when you share your projects! Post your project on Instagram, YouTube, or Twitter, and make sure to tag @bareconductive or use #bareconductive. You can also send your videos and photos to info@bareconductive.com so we can post them on our site for the world to see.
You will need:
- 1 x Pi Cap
- 1 x Raspberry Pi, power supply and associated cables
- 1 x Computer running Mac OS, Windows or Linux
- Philips Hue bulb and light bridge
Step 1 Install the phue library
If you haven't set up the Pi Cap before, please do so now by following the set-up tutorial. Once you've done so, install the Philips Hue Python library, by entering
sudo pip install phue
Then clone the Git Repository, by entering
git clone https://github.com/BareConductive/picap-hue-py.git
This should set everything up on the Raspberry Pi.
Step 2 Edit the code
Next, you need to edit the code to make it work with your light. First, find out your Hue's IP number. Back in the Terminal, open the code with
nano ./picap-hue-py/hue.py
Edit the variable bridgeip and enter your IP number. Then, check out the name of your lamp on the Philips Hue app and change the name of the lamp by editing the variable light.
Step 3 Run the code
Try running the code with
python ./picap-hue-py/hue.py
You should get an error message "The link button has not been pressed in the last 30 seconds.". This is expected. Now, push the button of the Hue bridge and run the code again. Touch electrode E0. You should get a message "Turning light on" with the smart lights turning on!
Step 4 Add a proximity sensor
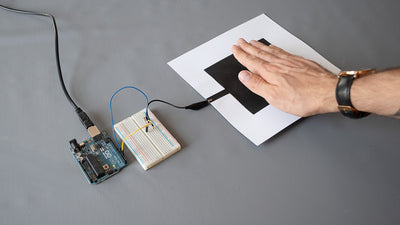
With the Pi Cap being able to turn the lights on and off, we can now add our proximity sensor: a Printed Sensor and an alligator clip. Terminate the code, by pressing CTRL + C, and attach the sensor with the crocodile clip. Run the Python script again and hover your hand over the sensor to turn on the light and hover again to turn it off!
Step 5 Next steps
You can take this project further and add more smart lights and create more switches. We were inspired by MagPi's project, which uses a script that allows for more lights and modifications. You even change the color ambiance or attach the sensor on your wall to act as a wall switch.
It's also possible to create a Hue dimmer switch. By using multiple electrodes of the Pi Cap, you can arrange them in a row or circle so that when you swipe your finger across the sensors, they act as a dimmer switch. You could even use proximity sensing as a dimmer.
You can also create your own sensors by using Electric Paint or other conductive materials. You could even integrate the sensors behind surfaces, for example, a table, so that when you touch the table, the light goes on.