Our hardware uses Capacitive Sensing. What is it?

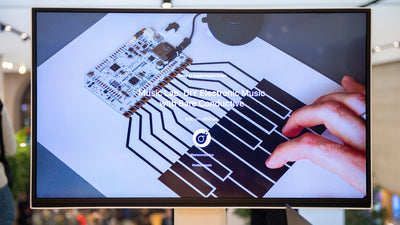
Our Touch Board, Pi Cap, and Light Up Board leverage clever physics to make any surface interactive
At Bare Conductive we focus on making scalable smart surfaces, and capacitive sensing is a foundational part of that vision. Starting with our Electric Paint, Bare Conductive has created tools which make prototyping smart surfaces easy. From the very beginning, our customers have used Electric Paint to create capacitive sensing on a diverse array of surfaces for an equally diverse set of use-cases. Our Touch Board, Pi Cap and Light Up Board all use capacitive sensing to transform a pad of Electric Paint into a powerful sensor. This functionality isn’t limited to prototyping, Bare Conductive’s Dynamically Functional Surfaces use capacitive sensing to create solutions for OEM partners in the smart building and automotive space. Given our intimate understanding of this technology, we thought it would be useful to discuss capacitive sensing in further detail, to give you more context for our products and for the role that capacitive sensing plays in our everyday lives.
Capacitive sensing is a technology that can be viewed as replacing mechanical buttons and it is a prevalent technology, for example, every smartphone uses capacitive sensing within the screen to make it a touch screen. Whilst there are different ways to achieve capacitive sensing, the principles are similar and with a capacitive sensor, the user can either detect touch or proximity.
Our technology and our products, including the Touch Board, Pi Cap and Light Up Board, all share this same technology. Together with Electric Paint, it allows users to create various interfaces, occupancy sensors or fluid detectors. But what exactly is capacitive sensing?

How do capacitive sensors work?
First, let’s discuss what a capacitor is. In an electrical circuit, there are three fundamental components: resistors, capacitors and inductors. A resistor is a passive element that dissipates energy. Inductors and capacitors, however, are active elements, they store energy, and it’s capacitors that allow you to do capacitive sensing. Vice versa, you can do inductive sensing with inductors.
A capacitor in its simplest form compromises two conductive plates that are separated by a dielectric medium, which can be air, but in most cases is porcelain, glass or plastic. When a voltage is applied across the capacitor, they store a charge and an electric field forms across the dielectric. Capacitors can be used to smooth out the output voltage of a power supply or for filtering in signal processing. The amount of charge a capacitor can store is dependent on its capacitance and the capacitance of a capacitor is dependent on the area and distance of the plate and the dielectric constant. Capacitive sensing in turn is detecting the change in capacitance. An inductive sensor is similar to a capacitive sensor, but uses the inductance of a sensor to detect or measure objects.

A touch capacitive sensor is therefore a sensor that uses the change in capacitance to sense touch or the presence of bulk material or fluids. Proximity capacitive sensors work like touch capacitive sensors, except they are more sensitive. There are two common ways to do capacitive sensing. One is self-capacitance and we use this sensing with our technology. On our boards, there are a number of electrodes that are used for capacitive sensing. You can think of them as one plate of a parallel-plate capacitor. The other plate is the surface of the earth – very large, but quite far away. When you bring part of your body close to one of these electrodes, that body part acts as the other plate of the capacitor. It takes over from the earth, as the body part is much closer and so has a bigger effect, and this increases the capacitance measured on that electrode. This is a proximity sensor and this change is registered by the board. If you bring your hand so close that you actually touch the electrode, the effect is even bigger than if you are just close to it. If you look at the output from that electrode on our Grapher, you will notice that the line goes down, not up – that is because the chip that measures capacitance on our boards has an output that is inversely proportional to capacitance – if the capacitance goes up, the output goes down. Each electrode of our boards acts as a capacitive touch sensor or as a capacitive proximity sensor. This method of capacitive sensing is called self-capacitance and each electrode is working independently. Here the capacitance is measured with respect to earth ground.

Another method is mutual capacitive sensing, which is the one used in touch screens of smartphones. With mutual capacitive sensing, there are two grids of capacitors overlaying each other. Instead of having two capacitive plates that don’t face each other, the plates lie next to each other. When a voltage is applied, you have a grid of capacitor plates that generate an electric field in-between them. When you approach them with your finger, it changes the characteristic of the field and that change is registered as a touch. This method of capacitive sensing allows you to detect more than just one capacitive touch and instead it can detect multiple touches.

Another important type of capacitive sensing is a capacitive displacement sensor. These are mostly used in manufacturing and are used for the measurement of distances and any displacement. In a capacitive displacement sensor, you have one part of the capacitor in a cylindrical shape, which forms the first plate of your capacitor. The other plate is formed by the area that is being measured. Since the area and the dielectric constant of the sensor remain constant, the distance can be measured by detecting changes in the capacitance allowing one to sense the position of the object.
With capacitive sensing, the user is able to detect and measure touch or proximity, the presence of a bulk material or fluid levels, and much more. You can use a capacitive sensor to create touch interfaces, like the touch screen on a smartphone, or as a proximity sensor, where you can create a switch, by hovering your hand over the sensor.
Benefits of capacitive sensing
Capacitive sensors are used for detecting a range of objects, from non-conductive and conductive material, to tiny objects, like insects, and larger ones, like a human. Using capacitance sensing brings many advantages compared to other sensing technology. We use these features in our technology to detect active interactions, such touches and hand movements to create interfaces, as well as passive ones, for example occupancy sensors. Another benefit of capacitive sensors is that one can detect either solid materials or fluids. You might have seen this when you have droplets on the touch screen of your smartphone and it becomes unresponsive. We harness this power in a different application, because we use our capacitive sensing technology to build fluid level sensors, like a leak detector.
Not only can you detect a capacitive touch event with a capacitive sensor, but also use one as a proximity sensor. This can be used in two ways. First, you can create a capacitive sensor and use it as a light switch. But instead of touching the sensor, you can approach the sensor with your hand to turn on a light. Second, you can embed the sensors behind a different material, like plastic. You can then touch the plastic surface to trigger an event. This might seem like another touch sensor, but it is a capacitive proximity sensor, even though you are you touching the plastic. So capacitive sensors can be embedded and hidden in an environment and these interfaces can be easily cleaned or hidden, even underneath the flooring in a room.
Capacitive sensors are not limited to be binary and act as on and off switches. They can also be used to create a switch where one can adjust the brightness, by approaching the sensor with your hand or body. Indeed, this is what we have as an example with our Electric Paint Lamp Kit, where one lamp uses the electrode of the board for proximity sensing.
Lastly, capacitive sensors are, comparatively to other sensing technology, cheaper to build, while still maintaining a high resolution and remaining easily adjustable. Using our Printed Sensors in combination with the capacitive touch sensor of our boards is just one example of how you can combine the two technologies to create an effective and high resolution proximity and touch sensor.
The last advantage listed above is also one of the main disadvantages of capacitive sensing: a high level of precision means that the sensors are easily influenced by noise, such as change in humidity or change in the sensing environment. This is why in some applications it is better to use an inductive sensor instead of a capacitive sensor. Furthermore, parasitic capacitance, which is any unwanted capacitance that can arise in a circuit, also needs to be accommodated for. These disadvantages must be accounted for when working with capacitive sensors. This is why, for example, we include shielded cables in our Interactive Wall Kit, as it reduces the noise interference.
How to use capacitive sensing
Capacitive sensing is great for creating touch interfaces, proximity interfaces, motion, force and acceleration detectors or for use as fluid and humidity level sensors. Depending on your application, implementing capacitive sensing can range from easy to implement, to requiring more complex technology.
With our boards, for example, the Touch Board, the Pi Cap and the Light Up Board, it’s very easy to create a capacitive touch sensor. Each board has at least 6 electrodes, which act as the sensors, and can be extended with a conductive material, like Electric Paint, thereby increasing or extending the sensing area. Each electrode can then act as a touch or proximity sensor.
The physics behind an electrode and a sensor is as following: when one of the boards is powered up, a voltage is applied to each sensor. This creates an electric field around each capacitive sensor with a reference to the earth ground. When you touch the sensor with your finger, you are changing the electric field and therefore the capacitance of the sensor. This is the change that is detected and interpreted as a touch. By changing the settings, smaller changes in the electric field can be detected and interpreted as an approach with a finger, therefore creating a proximity sensor. This method of capacitive sensing is called self capacitance.
On the touch screen of your device, it’s very similar. But instead of having each capacitor a reference to the earth ground, there is a whole array of capacitors that are referring to each other, through capacitive coupling. The connection between each tiny capacitor is characterised by the mutual capacitance. When the user touches the screen, they are again changing the electric field of the capacitors and changing the mutual capacitance.
Using capacitive sensing brings a range of benefits, such as being able to hide the sensor behind materials that are easy to clean or to keep them as a proximity sensor. With our Touch Board Pro Kit it’s straightforward to prototype a capacitive proximity sensor and use it as a light switch, where you only hover your hand over the sensor to turn on lights.
Where capacitive sensing is used today
Capacitive sensing can be used in a whole range of applications. The most common one is using it with a touch screen. The flexibility and low cost of creating capacitive sensors using indium tin oxide, which is a near transparent conductor, is what makes smartphones so magical: the user touches a piece of glass to interact with their device.
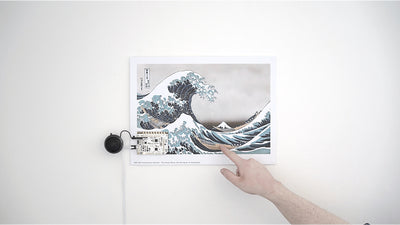
We use capacitive sensing in a different way. With our boards, for example, the Touch Board, Pi Cap or Light Up Board, many of our community use the sensing technology to create simple, but super effective interfaces. Whether it’s in a massive interactive mural for projection mapping, or the touch button in a lamp. We have developed our boards with Electric Paint in mind. The benefit of Electric Paint is that it gives the user a lot of flexibility and creativity. You can either paint the shape you want for creative purposes or print a sensor on paper or other substrate to embed a sensor in your environment. The combination of our Electric Paint and capacitive sensing technology allows you to turn every surface and object into a sensor. You could paint your wall with the paint or embed a sensor pad with the paint behind the surface of a table, then hook up the paint with a sensor electrode. The wall would then become a capacitive touch sensor, the table would house a capacitive proximity sensor, and we have turned mundane objects into smart surfaces.
An interface is an active element of a design, but you can also use capacitive sensing as a more passive element. An occupancy sensor is one example. These occupancy sensors can be used in a range of applications, either a simple occupancy sensor in a chair, detecting whether someone is using the chair or is sitting properly, or embedding the occupancy sensor under a floor. A floor sensor can then be used in commercial environments to see how many customers are in a store, or in healthcare, where you can detect whether someone has fallen.
If you want to explore capacitive sensing in your own applications, our development kits and hardware provide an easy starting point for prototyping smart surfaces. For companies looking to integrate smart materials directly into their materials or products, we are always looking for interesting partnerships where our technology can add value. We believe our technology holds the promise of truly integrating the Internet of Things into our lives in a seamless and non-intrusive way, and we’re working on building capacitive sensors directly into our environment, making the spaces and surfaces around us smarter, healthier, and more extraordinary.
For more information on how we work with industrial partners to develop scalable printed electronics solutions make sure to visit the LAIIER.
Bare Conductive has launched LAIIER, productizing its Dynamically Functional Surface™ technology for applications in the smart building.
Stay connected with Bare Conductive. Follow, like and comment on Facebook, Twitter & Instagram.