Rabobank - Adding Interactivity To An Exhibition Stand For A Bank

Interactive murals are a proven way to attract visitors to an exhibition stand and keep them there longer
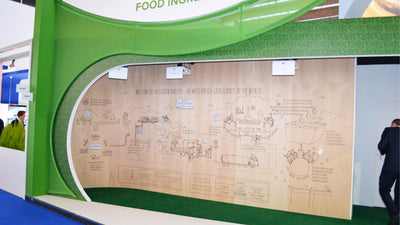
Interactive installations and projection mapping gain ground in the exhibition stand industry. The audience is more familiar interacting with smart surfaces than ever and we see that more businesses focus on the interactivity to offer a unique experience to their potential customers.
We caught up with Boldly XR, Netherlands-based creative agency to find out more about the custom exhibition stand they built, using the Bare Conductive Technology.
The team at Boldly XR brought into this process by a partnership they had with a Dutch stand builder, KopExpo, which they supplied the Rabobank stands for their exhibitions and Boldly recently started a partnership with them to mutually bring booths to the next level with the help of creative technology.
The exhibition stand was for Rabobank IT, which is one of the largest recruiters of IT personnel in the Netherlands. Boldly’s vision was to differentiate vastly from most other things out there, in their field, they tend to visit trade fairs a lot with their clients and what they see are heaps and heaps of missed opportunities.
Usually, interactive technology is slapped onto a stand to make a company seem more “innovative”, but it’s hardly ever a seamless experience, skill-fully intertwined and part of the corporate identity. This makes for pretty jarring, janky experiences that miss out on the one thing that they were designed to do; create meaningful impact.
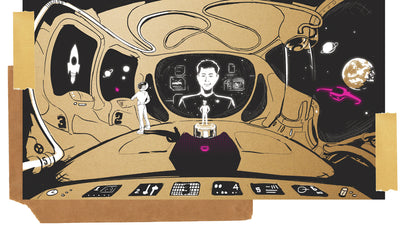
They suggested building a wall, that would make use of conductive surfaces and projection mapping on the technical side. While the conceptual side they wanted to break many of the conventions that usually come with corporate recruitment; envisioning a picture perfectly, heavily moderated and a clean look at the mere exterior of a company. Yannick Boers, the XR Designer says that they wanted to tell the story from the perspective of the people that actually work there, designing the wall and functionality based around their input, what would they have wanted to know about their future employer if they were out there, looking for a job.
Based on that they decided they wanted to take a two-pronged approach with the wall. To be able to show how each specialisation contributes to the products used by millions of clients of the bank and they also wanted to distil the conversations they’ve had with developers to core values that mattered to them.
Designing interactive projection walls is truly unlike anything else. It’s quite a challenge to create a design that is a beautiful marriage of both the digital and physical components, which depending on the input of the user, could be literally any combination of projected designs on the wall. Especially as these components are animated and move around the wall, the effective use of blank space is crucial.
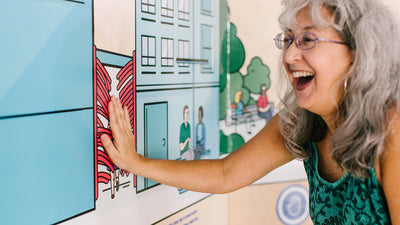
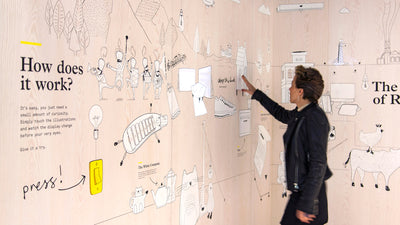
On the left side of the wall, they envisioned the outline of a smartphone, to display the contents of the Rabobank app and use as a storytelling medium/output for a row of the 7 major specialisations of IT at Rabobank. On the right side, they wanted to show the core values featuring animation and short text per element plus face to face interviews they shot with the developers talking about their job at Rabobank.
The difference in the design process of this exhibition project compared to other projects is the fact that one has to get quite ‘nitty-gritty’ on the technical requirements right away, more so than in-app/web design as conductive paint is way more permanent. For instance, they’d had to think immediately about the capabilities of the projectors for the placement and quality of the design.
Because while Ultra-Short throw projectors have become increasingly impressive over the last couple of years, and they could quite comfortably cover the whole 4 metres on the X-axis with a distance of only 60 cm, the Y-axis was a lot more limited at only 150 cm of the total height of 244. That meant they had to centralise all content that was to be projected, while not giving the design a “boxed” feel (they found that projecting edges would decrease the “magical” aspects of the wall. So they opted for elements outside the projected area as well, that would only produce sound when touched).
Next to the interactive installations, they also built VR/AR installations, so they’re quite adept in rendering 3D scenes. To help visualise the end result for their client before production began, they created several renders of the design. Instead of 6 weeks, the team had to do the entire production of the wall installation in only 7 consecutive days, so the installation is ready for the event.
They looked into how to best transfer the design they created digitally to a physical wall. For which they considered several options: projection painting, stencilling and screen printing. It was vital to the design team that the digital design would be transferred to the wall as faithfully as possible, as the accuracy of the animation elements interacting with the physical elements depended on it.Projection wasn’t ideal for them, because the biggest part of the design they made featured nice clean edges, that would be hard to nearly impossible for someone to trace accurately. Neither was screen printing, as the sizes, they needed for the wall would be hard to pull off within screen printing techniques, especially fitting multiple windows together would be nearly impossible.
So they settled on stencilling. Which meant they converted the digital design to cutting lines for a cutter, which would cut out the stencil from large vinyl sheets. After removing the stencil sheets, it was time to stick the vinyl to the surface.
They thoroughly brushed the surface to make sure it would stick properly. They created small dovetails in the design file earlier so that they could accurately fit together the large sheets like puzzle pieces. Laser alignment was used to make sure the placement would be exact. They had to make sure that everything works perfectly, as the animations were already in production too.
They used Electric Paint by laying all the panels flat on the ground and covered them with two small rollers, making sure we lay down a thick, even coat. Not everything they painted was going to be used as a conductive surface and the paint is quite precious, but they opted to use Electric Paint for those areas as well as it’s so incredibly black that other paints would stick out.
After peeling the vinyl, all the lines were incredibly smooth, the paint hadn’t crept at all, the panels looked like they’ve been printed and not painted. All the animations on the surface were custom and handmade specifically for KOPexpo and the Rabobank. They would tell the story about the benefits of working as a developer for Rabobank and the amazing impact they have on the products global customers use.
For the interactive installation, they drilled holes into the walls and connect the front of the wall to the back with stripped wires. At the back, the wires were held in place with nails and a bit of hot glue and on the front, the wires were cut so that they were flushed and then painted over with Electric Paint. They created overall, 35 touchpoints for their wall.
Two ultra-short Optoma projectors were used and the projectors were attached to custom-made beams that could be extended or shortened in order to adjust the image. Due to the weight of the projectors, they had to be counterbalanced with weights. As the projectors had 4000 lumens, they were bright enough to work in any environment.
Behind the wall, the microcontrollers and projectors were connected to a computer, which ran the projection mapping software MadMapper. Any interaction with the Touch Boards sent a MIDI signal to the computer and triggered the animation within MadMapper. Simultaneously, the computer was connected to a stereo system through an amplifier to play sounds along with the animations.
In the end, the interactive wall was received with great enthusiasm by all attendees of the Rabobank IT recruitment exhibition event. Due to the design of it, it was possible to de-and reassemble the installation over 8 times so far.
Images & Video: Boldly XR
We love it when you share your projects! Post your project on Instagram, YouTube, or Twitter, and make sure to tag @bareconductive or use #bareconductive. You can also send your videos and photos to info@bareconductive.com so we can post them on our site for the world to see.