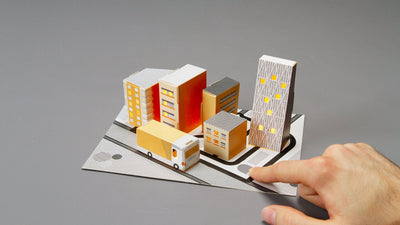
How to make a light up city skyline

Make a light up city skyline silhouette with the Electric Paint Circuit Kit
The Electric Paint Circuit Kit is a great kit to create a small city circuit, which you can then light up. If you are looking for another project with the kit, we suggest adding lights to a city skyline silhouette! Before you get started, you need to remove the lights from your circuit if you have completed the Electric Paint Circuit Kit before.
Create a city skyline
First, design or download a city skyline silhouette. You can find many artworks online, we found ours here. Before printing it, add placeholders for the LEDs, by creating rectangles of the size 7 x 13mm and marking them with a "+" and "-". Also, draw the trace of your circuit for the LEDs and add two circles, around 12mm apart, for the batteries. Mark the circles also with a "+" and "-", making sure that all the "+" are connected with each other and all the "-" as well.
We're using three batteries, so we draw three individual circuits. Once done, print the skyline on thick paper. If you want, you can download our design.

Paint the circuit
Place the LEDs from the Electric Paint Circuit Kit in positions, making sure that the negative and positive sides are correctly placed. Then, with the Electric Paint tube, apply a little bit of paint between the LED and the circuit. Repeat this with the other LEDs and then paint the circuit.
Make a case for the battery
While the paint dries, you can make a case for the battery. This is not necessary, but looks nice! Simply use the battery holder from the Electric Paint Circuit Kit, place it on black card, mark it out and cut the holder out.

Light up the circuit
Place the battery on the circuit, aligning the "+" and the "-" of the battery with the marking on the silhouette. Your city skyline silhouette should light up!If it doesn't light up, have a look at the paint. Does it appear cracked or incomplete anywhere? If yes, apply some more paint to it.