Make an Interactive Poster Using Touchless Sensing

Use the Touch Board and Printed Sensors to create a proximity sensing poster that plays custom sounds
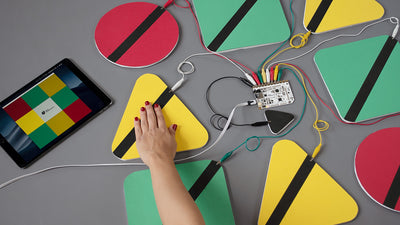
With this interactive poster, Printed Sensors and a Touch Board are placed at the back of the poster. On the front, you can attach interactive points, for example, images or drawings. When you touch the interactive points, it triggers the Touch Board via proximity or touchless sensing and the Touch Board plays a track of your choice, which can be a sound or a recording. You can use this poster to hold a more interactive presentation and give the user more information or data.
Using Printed Sensors is an alternative way of creating an interactive poster with Electric Paint and allows you to be more creative with the design of your poster. It’s also a great project for the Interactive Workshop Pack, which contains everything you need to create this poster. Use this project in your session with your students.
If you haven’t set up the Touch Board with Arduino yet, please do so now.
We love it when you share your projects! Post your project on Instagram, YouTube, or Twitter, and make sure to tag @bareconductive or use #bareconductive. You can also send your videos and photos to info@bareconductive.com so we can post them on our site for the world to see.
Step 1 Design your poster
Before you can get started with the interactive poster, you need to design it first. You have to think about what your interactive points should look like and on which material you want to present the points. In this example, we are using 4 small images of animals as our interactive points, so each image is an interactive point. We are using foamboard to present our interactive poster.

Step 2 Prepare the Touch Board
If you have set up the Touch Board for MIDI before, make sure to remove any of Electric Paint from the MIDI bridges. You can simply chip off the Electric Paint.
Then, connect your Touch Board to your computer with the USB cable and turn the Touch Board on. In the Arduino IDE, go to
File→Sketchbook→Touch Board Examples→Proximity_MP3
Make sure to select the correct Board and Port settings before hitting upload.

Step 3 Upload MP3 Files
Next, we need to upload our MP3 files onto the Touch Board. We are just using some facts about the animals, which have been recorded in MP3 format. You can create the tracks for your interactive poster either by recording something on your phone, use a Text to MP3 converter or use a song, the choice is yours!
When you have your MP3 files ready, turn the Touch Board off, remove the SD card and insert the card with the card reader into your computer. On your computer, find the MP3 files that you want to use on the Touch Board. The names of the tracks require to be TRACK0XX.mp3, where the XX is the corresponding electrode. For example, TRACK000.mp3 is played when electrode E0 is triggered, TRACK003.mp3 for electrode E3 and so on, up to TRACK011.mp3.
Once you have uploaded all the tracks, remove the SD card from your computer and insert back into your Touch Board.
If you want to have a detailed tutorial on how to upload your own MP3 tracks, check out the “How to change MP3 on the SD card” tutorial.
Step 4 Cut the Printed Sensor
If you are creating four interactive points, cut the Printed Sensors into four pieces. Make sure that each piece has at least one access node on it, one of those circles that are at the edge of the sensors.

Step 5 Attach the Printed Sensor pieces and the Touch Board
On your poster, attach the Printed Sensors behind the interactive points. It helps to attach the interactive points first, that you have created in Step 1 before, then hold up the poster against the light to see where the interactive points are, so you can attach the Printed Sensor pieces directly behind. You can use the sticky tabs to connect the Printed Sensor to the poster.
You want to place the Touch Board in the bottom center of the poster so that you can easily connect all four Printed Sensors pieces to the board. You can use either the sticky tabs or Blue Tak to attach the board.

Step 6 Connect the Printed Sensors to the Touch Board
Connect the Printed Sensors to the Touch Board with crocodile clips. It’s easier to space the clips out on the Touch Board, for example, connect the four clips to E0, E3, E6 and E11.
In order to reduce troubleshooting, it’s useful to coil up any slack wires and secure them with masking tape. Cables that hang around loosely tend to cause interference in each other.

Step 7 Test the sensors
Turn the speakers on, connect them to the Touch Board and attach them to the side of the Touch Board with the velcro sticker. Connect the Touch Board to power and turn the board on.
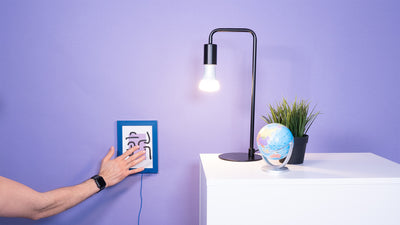
Test the sensors by approaching them with your hand. You should hear your tracks!

Step 8 Test your interactive poster
With everything in place, you can now add the final touches to your interactive poster. With the Touch Board and the speakers turned on, touch your interactive points. You should hear your tracks again!
Step 9 Next steps
You can create more touchless or proximity sensors to the Touch Board, but make sure not to cross the wires!