Make An Interactive Memory Game

In this tutorial, we’re going to show you how to use conductive ink to create and play an interactive memory game. So not only are you creating your own game, but you're improving your memory skills! The game is similar to the matching game Simon, where you have to remember a sequence of colours. The paint is used to create an interface on the buttons for the game and the Touch Board is configured as a keyboard and communicates with the computer.
This is a great project for the Interactive Workshop Pack and is a super way to learn about the Touch Board and Electric Paint. You can incorporate this exercise into your lesson with your students.
Before beginning, make sure to download Processing as it can take some time to download. If you haven’t set up the Touch Board with Arduino before, please do so now.
We love it when you share your projects! Post your project on Instagram, YouTube, or Twitter, and make sure to tag @bareconductive or use #bareconductive. You can also send your videos and photos to info@bareconductive.com so we can post them on our site for the world to see.
Cut out the buttons
First, we’re going to create the game buttons. Cut out 8 pieces of different shapes from red, green, yellow cardboard and make sure each individual shape is about the size of A4 paper. You want to have 3 yellow and green buttons, and 2 red ones. Additionally, cut out one more piece for a start button from black cardboard, which is smaller than the other buttons. This will be the start and reset button.
In order to make the buttons more sturdy, we stuck the cut-outs to foam board.
Paint the buttons
Next, we’re going to apply Electric Paint to the buttons, which is going to be the interface for the game. We painted diagonal lines and used masking tape to neatly apply the paint. If you also want to use masking tape, we recommend sticking the strip of masking tape to a piece of clothing first, to reduce its stickiness and avoid ripping the cardboard.
Paint the line for the 8 buttons and cover the start button completely with Electric Paint. Remove the masking tape when you are done with painting. Let the paint dry for 15 mins. In the end, you want to have 3 green buttons, 3 yellow buttons, 2 red buttons, each with a diagonal line of Electric Paint, and a small, black start button, painted completely with Electric Paint.
Upload the code onto Touch Board
While the paint is drying, connect your Touch Board to your computer with the USB cable and turn the Touch Board on. In the Arduino IDE, go to
File→Sketchbook→Touch Board Examples→HID_Keyboard
In the code, go to line 50, comment it out, and comment line 52 in. Make sure to select the correct Board and Port settings before hitting upload.
When the code has been uploaded, swipe across the electrodes on the Touch Board, from E0 to E8, to test the code. On your computer, the numbers “801234567” should have appeared in the code file. You can simply remove it again, we’re just checking the code is working as expected.
Prepare the game in Processing
If you haven't used Processing before, open and close it once so that it generates the necessary files.
Then, download our game. Unzip the file and move the folder "MemoryGame" to the corresponding location:
Windows
Libraries\Documents\Processing
or
My Documents\Processing
Mac
Documents/Processing
Linux (Ubuntu)
Home/Processing
With the folder in place, open Processing. You need to install the "Sound" library for the game. In Processing, head to
Sketch→Import Library→Add Library…
In the search field, look for "Sound" and then click “Install”. Once you have installed the library, open the game sketch, by heading to File→Sketchbook and then opening “MemoryGame”. If you want, you can run it, by pressing the "Run" button in Processing.
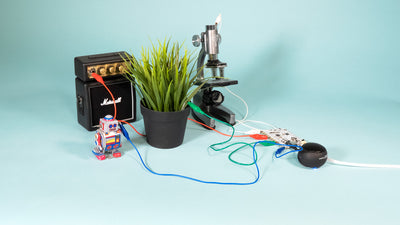
Connect the buttons to the Touch Board
Once the paint has dried and the code has been uploaded to the Touch Board, turn the Touch Board off and disconnect it from the computer. Take 9 crocodile clips and attach them to Touch Board from E0 to E8. Connect the other end of the crocodile clips to the painted buttons making sure that paint is in contact with the clips. Make sure that none of the cables is crossing over each other, as this might cause interference. In the end, you want to have a set-up similar to the image below.

Play the game
Connect your Touch Board to your computer again and turn the board on. In Processing, run the game and then press your start button to play. Learn and memorise the sequence of colours and sounds and press the corresponding buttons. Work your brain and enjoy the memory game!
Next steps
You can also take this project further and modify the memory game in Processing or design your own game controllers! You could, for example, change the buttons field in Processing, by changing the colour of the buttons. They are declared in the set-up, with each button having a HEX number for their colour. You could also increase the number of buttons, there are a couple of electrodes spare!
We have detailed tutorials for you to learn about using the Touch Board as a keyboard. We’d love to see your creations and what games you design, so feel free to send us images or videos via Instagram or Twitter.
If you have any troubles, have a look at our Touch Board troubleshooting guide or contact us at info@bareconductive.com.